How to find the source of a mysterious water spot on your Leawood ceiling
Finding a water spot on your ceiling can trigger immediate panic. Is it a roof leak that will cost thousands? A plumbing failure that could flood your home? Before you call every contractor in Leawood, you need to know what you’re dealing with. Plumbing Gladstone.
Water spots on ceilings typically appear as discolored patches ranging from yellowish-brown to dark brown. They might be damp to the touch or completely dry. The key to solving this mystery lies in understanding what causes these stains and how to identify the source before you spend money on the wrong repair. EPA guidelines on moisture control.
In Leawood’s older neighborhoods like Hallbrook and Leawood South, many homes built in the 1960s and 1970s have aging plumbing systems that can develop pinhole leaks in copper pipes. The freeze-thaw cycles common in Kansas City winters cause pipes to expand and contract, creating weak points that eventually fail. Meanwhile, the area’s clay soil shifts slightly with moisture changes, potentially stressing pipe connections in homes with slab foundations.
According to the International Plumbing Code Section 305.4, plumbing systems must be installed to prevent water damage to building structures. When a leak occurs, it violates this fundamental safety requirement and needs immediate attention. International Plumbing Code Section 305.4.
Let’s walk through the diagnostic process step by step so you can identify whether you need a plumber, a roofer, or just need to monitor the situation.
Step 1: The Active vs. Inactive Test
Touch the water spot. Is it damp or dry? This simple test tells you if the leak is active or if you’re seeing old damage.
An active leak will feel cool and slightly damp. The moisture might come back within hours if you dry it with a towel. An inactive spot feels dry and room temperature, though it may still be slightly softer than surrounding drywall.
If the spot is active, place a bucket underneath and monitor how quickly it fills. This helps determine the severity of the leak. A slow drip might give you time to schedule repairs, while a steady stream indicates an emergency.
Check the spot at different times of day. Roof leaks often only appear during or after rain, while plumbing leaks run consistently regardless of weather.
Quick Tip: Use a moisture meter from any hardware store to get a precise reading of moisture content in the drywall. Readings above 17% indicate active moisture problems.
Step 2: Location Analysis – What’s Above?
The ceiling location provides crucial clues about the leak source. Water follows the path of least resistance, so the spot you see might not be directly below the actual leak.
Directly below a bathroom or kitchen: This strongly suggests a plumbing leak. Common sources include failed shower pan liners, cracked toilet flanges, or deteriorated supply line connections. In Leawood’s mid-century homes, galvanized steel pipes often corrode from the inside out, creating pinhole leaks that spray water into ceiling cavities.
Near exterior walls: This could indicate a roof leak, especially if you have a chimney, vent pipe, or roof penetration nearby. Kansas City’s severe weather, including hail storms and high winds, can damage roofing materials and flashing.
Center of room away from walls: This pattern often points to HVAC condensate line issues. During humid Kansas City summers, air conditioning units produce significant condensation that drains through pipes. If these lines clog or crack, water can back up into your ceiling.
Random locations: Sometimes water travels along pipes, ductwork, or ceiling joists before dripping down. A leak near your front door might actually originate from a bathroom on the second floor.
Visual Aid:
Diagram showing common ceiling leak locations relative to plumbing fixtures and roof penetrations.
Step 3: The Color and Texture Test
Water spots develop characteristic colors and textures based on their source and duration.
Yellowish-brown stains: Fresh water from clean sources like supply lines or condensation. These spots often have smooth edges and may feel slightly raised.
Dark brown or black stains: Older water damage or water that has passed through contaminated materials. These spots often have irregular edges and may feel soft or spongy.
Musty smell: Indicates mold growth, which requires both moisture and organic material. This smell combined with a water spot suggests a long-term moisture problem that needs immediate attention.
Efflorescence: White, chalky deposits on the ceiling surface indicate mineral deposits left by evaporating water. This commonly appears with concrete or masonry ceiling structures.
Run your fingers across the spot. Active leaks often feel cool due to evaporation. Old damage feels room temperature and may crumble slightly when pressed.
Step 4: The Weather Correlation Test
Timing reveals the leak source. Monitor your ceiling spot during different weather conditions.
Roof leak indicators: The spot appears or grows during rain, especially heavy storms common in Kansas City’s spring and summer. You might notice the problem worsens during wind-driven rain or when snow melts off your roof.
Plumbing leak indicators: The spot grows regardless of weather. It might get worse when you use specific fixtures upstairs – for example, the spot expands when someone showers or runs the dishwasher.
HVAC leak indicators: The spot appears during hot, humid weather when your air conditioning runs constantly. It might disappear during cooler months when the AC is off.
Keep a simple log for 48 hours. Note when the spot changes and what activities occurred in the house. This information proves invaluable to whichever professional you ultimately call. DIY vs. Professional Drain Cleaning.
Step 5: The Sound Test
Sometimes you can hear a leak before you see it. In quiet moments, listen near the water spot.
Dripping sounds: Indicates an active leak, likely from a supply line or drain pipe. The sound might be faint and occur mainly when fixtures are used upstairs.
Hissing or spraying: Suggests a pressurized water line leak. This sound often accompanies rapidly growing spots and requires immediate attention.
Gurgling: May indicate a drain line issue where air is trapped in the plumbing system. This often accompanies slow drains and sewer gas odors.
Use a mechanic’s stethoscope or even a glass against the ceiling to amplify faint sounds. Move it around to pinpoint the sound’s origin.
Plumbing vs. Roof Leak: The Decision Matrix
Not sure whether to call a plumber or roofer? Use this comparison table to guide your decision.
| Characteristic | Plumbing Leak | Roof Leak |
|---|---|---|
| Weather dependency | No correlation | Worsens during rain |
| Water color | Clear to yellowish | May contain debris |
| Location patternNear plumbing fixtures | Near exterior walls/penetrations | |
| Timing | Constant or fixture-dependent | Only during precipitation |
| Smell | Musty if old | Earthy or musty |
| Repair urgency | Medium to high | High during active rain |
Visual Aid:
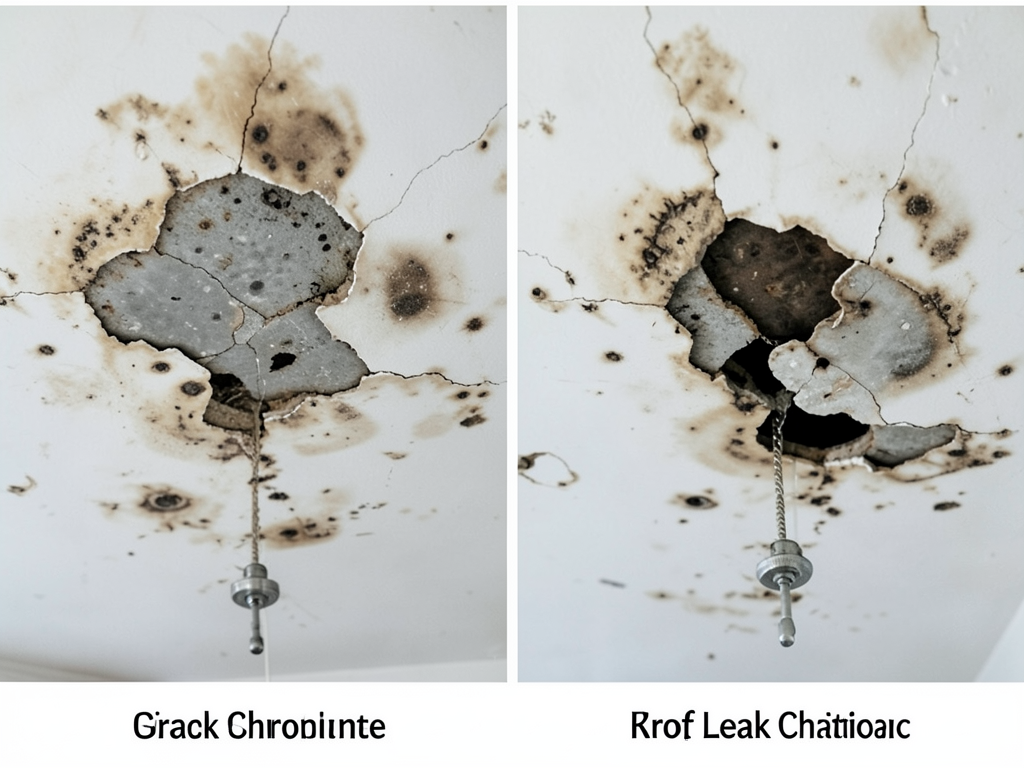
Side-by-side comparison photos showing plumbing leak vs. roof leak ceiling damage patterns.
Common Causes in Leawood Homes
Leawood’s housing stock presents specific challenges. Many homes in the area were built between 1960 and 1990, a period when certain plumbing practices and materials are now known to fail.
Copper pipe pinhole leaks: Kansas City’s water chemistry, combined with the area’s temperature fluctuations, accelerates copper pipe corrosion. Pinhole leaks can develop anywhere along the pipe length, not just at joints. These leaks often spray fine mist that travels along ceiling joists before dripping down.
Galvanized steel deterioration: Homes built before 1970 often have galvanized steel supply lines. These pipes corrode from the inside out, creating weak spots that eventually burst. The corrosion process is accelerated by Leawood’s slightly alkaline water supply.
Failed shower pan liners: Many Leawood homes have tile showers with vinyl or PVC pan liners. Over 20-30 years, these liners can crack or separate at corners, allowing water to seep into the ceiling below. The problem often goes unnoticed until significant damage occurs.
HVAC condensate line clogs: During Kansas City’s humid summers, air conditioning units remove substantial moisture from the air. This water drains through condensate lines that can clog with algae, mold, or sediment. When these lines back up, water overflows into ceiling cavities.
Roof flashing deterioration: Leawood experiences frequent freeze-thaw cycles that cause roofing materials to expand and contract. Over time, this movement breaks the seals around chimneys, vents, and skylights. The area’s occasional severe storms can also damage flashing and underlayment.
According to EPA guidelines on moisture control, any water intrusion must be addressed within 24-48 hours to prevent mold growth. This makes prompt diagnosis critical.
DIY Diagnostic Tools You Can Use
You don’t need expensive equipment to gather useful information about your ceiling leak.
Moisture meter: Available at hardware stores for under $50, these devices measure moisture content in materials. Press the probes against the ceiling and get instant readings. Values above 17% indicate active moisture problems.
Infrared thermometer: Cold spots on your ceiling often indicate active water intrusion. Water evaporates and cools the surrounding material. A temperature difference of 5-10 degrees from surrounding areas suggests active moisture.
Dye test: For suspected plumbing leaks, add food coloring to toilet tanks or drain lines. If colored water appears at the ceiling spot within 30 minutes, you’ve identified a drain line leak.
Water meter test: Turn off all water in your home and check your water meter. If the meter continues running, you have an active plumbing leak somewhere in the system.
Smoke test: For suspected roof leaks, professionals use smoke pencils to trace air movement. You can use incense – smoke moving toward a ceiling spot indicates air (and potentially water) infiltration.
Document your findings with photos and notes. This information helps professionals diagnose the problem more quickly and accurately.
When to Call a Professional
While DIY diagnosis helps you understand the problem, certain situations require professional intervention.
Call a plumber if: You notice water spots near bathrooms or kitchens, the spot grows when fixtures are used, or you hear dripping sounds. Also call if you suspect a supply line leak or if the spot is actively growing.
Call a roofer if: The spot only appears during rain, especially after severe weather. Also call if you see missing shingles, damaged flashing, or if the spot is near roof penetrations like chimneys or vents.
Call an HVAC technician if: The spot appears during hot, humid weather when your AC runs frequently. Also call if you suspect condensate line issues or if your AC unit is in the attic above the spot.
Call immediately if: The spot is actively growing, you see water dripping, there’s significant mold growth, or you notice structural damage like sagging ceiling material.
According to the National Association of Home Builders, water damage claims average $10,000 but can exceed $50,000 for severe cases involving structural damage and mold remediation.
Preventing Future Ceiling Water Spots
Once you’ve resolved the immediate issue, take steps to prevent future problems.
Regular plumbing inspections: Have a licensed plumber inspect your home’s plumbing system every 2-3 years. They can identify deteriorating pipes, loose connections, and other issues before they cause damage.
Roof maintenance: Schedule professional roof inspections every 2-3 years, or after severe storms. Clean gutters regularly to prevent water backup and ice dam formation during winter.
HVAC maintenance: Have your air conditioning system serviced annually, including condensate line cleaning and inspection. Consider installing a secondary drain pan with a float switch that shuts off the system if primary drainage fails.
Water leak detection: Install smart water leak detectors near water heaters, under sinks, and in areas prone to leaks. These devices can alert you to problems before they cause significant damage.
Monitor water pressure: High water pressure stresses plumbing joints and fixtures. Install a pressure gauge and keep pressure between 40-80 PSI. If pressure exceeds this range, install a pressure reducing valve.
Many Leawood homeowners find that preventive maintenance costs far less than emergency repairs. A $200 plumbing inspection might prevent a $5,000 ceiling repair and water damage restoration.
Understanding Repair Costs
Repair costs vary significantly based on the leak source and damage extent. Here’s what you might expect in the Kansas City area:
Plumbing leak repairs: Simple supply line fixes might cost $150-300. Pinhole leak repairs in walls or ceilings typically run $400-800. Major pipe replacements can exceed $2,000.
Roof leak repairs: Minor flashing repairs might cost $200-500. Shingle replacement typically runs $300-600 per square (100 square feet). Major roof repairs or partial replacements can cost $2,000-8,000.
Ceiling repair and restoration: Drywall replacement and painting for a small area might cost $300-600. Larger areas or those requiring mold remediation can exceed $2,000.
Emergency service premiums: Calls during nights, weekends, or holidays often include 50-100% premium charges. Some companies also charge trip fees of $75-150.
Many homeowners’ insurance policies cover sudden, accidental water damage but not damage from lack of maintenance. Review your policy and document damage thoroughly if you plan to file a claim.
Visual Aid: Photo gallery showing various ceiling water spot causes and repair examples.
Frequently Asked Questions
How can I tell if my ceiling water spot is active or old?
Touch the spot – active leaks feel cool and slightly damp, while old spots feel room temperature and dry. You can also use a moisture meter; readings above 17% indicate active moisture. Monitor the spot over 24 hours – active leaks will change size or feel.
Should I call a plumber or roofer first?
Start with the professional who matches your primary suspicion. If the spot appears during rain, call a roofer. If it’s near plumbing fixtures or grows when you use water, call a plumber. Many companies offer free inspections to help diagnose the problem.
How long can I wait before fixing a ceiling water spot?
Address active leaks immediately – within hours. For inactive spots, you have 24-48 hours before mold can begin growing according to EPA guidelines. However, the longer you wait, the more extensive and expensive repairs become.
Will my homeowners insurance cover ceiling water damage?
Policies typically cover sudden, accidental damage but not damage from lack of maintenance. A burst pipe might be covered, but a slow leak from corroded pipes often isn’t. Check your specific policy and document everything if you plan to file a claim.
Can I just paint over a water spot?
No. Painting over a water spot without fixing the underlying cause is like putting a band-aid on a wound that needs stitches. The damage will continue, and you risk structural problems and mold growth. Always identify and repair the source first.
Take Action Before the Problem Worsens
A ceiling water spot is more than just an aesthetic issue – it’s a warning sign of potential structural damage, mold growth, and costly repairs. The sooner you identify the source, the less expensive and disruptive the repair process becomes.
If you’ve gone through these diagnostic steps and still can’t identify the source, or if you’ve confirmed an active leak, don’t wait. Water damage spreads quickly and can compromise your home’s structural integrity.
Call (816) 473-9233 today to schedule a professional inspection. Our experienced technicians can quickly identify the leak source using advanced diagnostic tools and provide you with a clear, upfront plan for repairs. We serve all of Leawood and the greater Kansas City area with 24/7 emergency service available.
Don’t let a small water spot turn into a major renovation project. Pick up the phone and call (816) 473-9233 before the next storm hits or the next time you run your shower upstairs. Your home deserves prompt, professional attention.
Remember, the cost of a professional diagnosis is minimal compared to the potential damage from an unresolved leak. Protect your investment and your family’s health by addressing ceiling water spots promptly and professionally.